Display Express PC Installation – Windows 7-10 Pro
Installing Display Express software into a Windows 7-10 Pro computer is a fairly simple process. The software can also be installed in Windows 10 Home.
We don't recommend WIndows XP, as that software is no longer supported by Microsoft. Click here if you need instructions for XP Pro.
Enabling Internet Information Services
This group of services makes it possible to server Web pages from the computer.
Go to Control Panel > Programs and Features > Turn Windows Features On or Off.
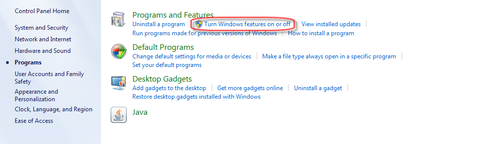
A Windows Features Menu will appear, it will often take a bit of time to load. Windows 8-10 has more ASP options, just check them all.
Select Internet Information Services (turns to blue square)
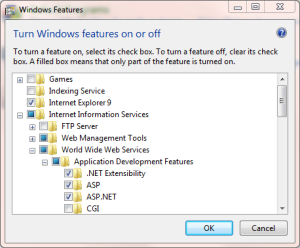
- Expand Internet Information Services
- Click on Worldwide Web Services
- Click on Application Development Features
- Check ASP.NET (and others for your OS)
- Click OK to install features
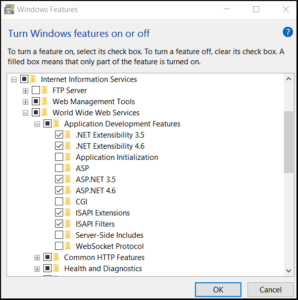
For a very few sites, the ability to see images in a Web page has been turned off. If that’s the case, you won’t see the header at the top of the Display Express pages. To fix this:
- Go to IIS as before and expand Common HTTP Features as shown above
- Check Static Content to enable images
Install DX Software
We ship Display Express on a USB memory stick, so you can install on servers and PC.
Insert the drive, then double-click the Setup.EXE installer. There will be the usual Windows pop-up questions, then an agree/disagree DX Installer popup, then:
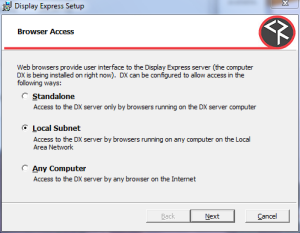
Use the Local Subnet selection for typical installs. This means others on your network can access the DX Web pages, but not from outside your network. If you need to change the settings, run the DX installer again and the options will appear.
When the app is complete, you’ll see 2 DX Icons, one launches DX, the other brings up the Manual. Click the DX icon and see if the DX login screen appears. Proceed if it does, if not, restart the PC.
COM Port
If you are using in a PC with an onboard COM port, or a USB to RS-232 adapter, this is a good time to define the port in Display Express. In Win7, the number of the port is at Control Panel/Devices and Printers. Under Unspecified, you’ll see a device usually named USB UART. Click the icon, then the Hardware tab. You’ll see the COM port number there.
When you have that info, login to DX and go to Setup/Options. Enter the COM port # there.
If you are restoring an existing DX PC from Contemporary Research, contact CR Support for the installer for the USB to RS-232 adapter.
Power Options
Right-click the background screen, choose Personalize, then Screen Saver. Select Power Options and make sure the computer does not go into Sleep mode or stop drive operation.
Starting With an Empty System
DX installs a default set of data when it installs. You could delete those items manually, but there’s an easier way.
- Log into the app as Admin.
- Go to the Presets/System page
- Click the Restore System radio button, then select ~Empty System~ from the pull-down list
- Click the Do Now button
- Now you have a clean slate to start from
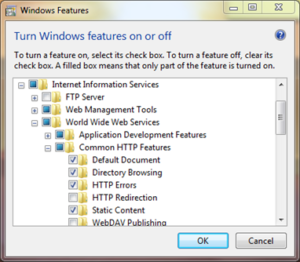
Fixing Missing Header on DX Web pages
In most versions of Windows, enabling Internet Information Systems activates most of the settings you need to deliver Web pages properly. We have seen rare cases where one setting is incorrect – the symptom is you can’t see the JPEG header at the top of the Web pages. To fix this,
- Go to Control Panel, select Programs
- That brings up Programs and Features, select Turn Windows Features On or Off
- Got to Internet Information Service and make sure Static Content is on as shown below
Moving DX data from an old PC to a new one
You can easily move your existing DX data files to a new PC using the System Preset feature - Click here to learn how.